| |
||||||||||||||||
| |
|
|
|
|
|
|
|
|
|
|
|
|
|
|
|
|
| |
|
|
|
|
|
|
|
|||||||||
 |
|
|
||
|
|
||||
| |
||||
| |
|
|
||
| |
||||
Below are some tools that are freely useable for licensees of RPManager. Some are free for non-commercial or academic use for anyone, but all require payment for commercial usage if not RPManager licensees.
Directory navigation shortcut system, for 32 and 64 bit XP/Vista. Go
to the FolderGit Info/Download page
Below are some plugins.
Used by Brad Nobles rig and some others, a link for convenience:
This tool colours polygons by 3, 4 or 5+ verts/edges. Makes it easy to see triangles, quads, and 5+ sided polygons for cleaning up models. Also has a numeric feedback as tiny triangles may be missed at a first glance.
Works on both poly and mesh stacks, but note it will convert mesh to poly. Go to the ColorPolyByVerts Help/Download page
This tool mirrors, flips or resets vertex positions, based on a symmetrical reference node. Created for morph target generation. Unlike the symmetry modifier, vertex ordering will not change so morph targets will not lose validity.
Works on poly, mesh and patch models. Go to the Transmographier Help/Download page
This is a tool that enables you to copy and paste vertex positions and vertex selections to and from anywhere in the stack.
Works on poly, and mesh models. Go to the PasteVertexBuffer Help/Download page
Modifier based edge based compression/expansion/convexity data generation.
Works on poly, and mesh models. 1.11 has no license file required anymore, and a new tension algorithm. Go to the Tension Help/Download page
Surface based morphing/pointcache time remapping plugin
Go to the SurfaceMorph Help/Download page
Below are some free plugins. Use at own risk.
Meshes splines. In some ways like renderable spline, but you can use a curve to control the shape. Go to the SplineMesher Info/Download page
Converts maps to vertex colours. Go to the MapToVColor Info/Download page
Blur your vertex colours. Go to the BlurVColor Info/Download page
Sets an entire objects soft selection value based on the maximum detected over the object. Go to the SSPropagate Info/Download page
This is a modified version of the standard wind modifier that ships with max. The update primarily affects how the turbulence operates, although falloff for wind has been modified too. Go to the BetterWind Help/Download page
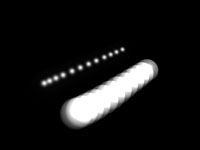
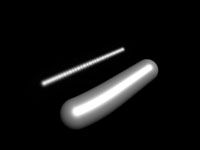
This is a modified multipass motion blur. Same settings as the built in one, with some extra options for the blending mode:
Clockwise from top left: Regular, additive, lighten, screen (with more steps). The screen and additive modes were originally intended for separate specular only passes - not accurate, but stops the per-pass clamping from leaving your supposedly hot speculars barely visible. Download here R6/R7/R8- copy it to your plugins directory and restart max. Download here R9 32 bit Download here R9 64 bit R5 version here.
This is a rewrite of my old Translucency fake script as a plugin - so many many times faster. Works on vertex colours, you can either paint them or use the assign vertex colours utility. Download here (R6/7/8) - - copy it to your plugins directory and restart max. For some basic instructions on how to use it watch this. (2meg quicktime)
Note you'll need to set up your materials with vertex colour maps to see the results in a render - say in the selfillumination and/or diffuse. For a simple sample scene with this plugin applied and a material setup download this. (R6 scene, zipped) BE AWARE: this modifier converts the incoming data to trimesh - so poly data flowing up the stack will end up as mesh. The e.poly code is almost working, so if anyone really needs it to stay a poly (ie putting a turn to poly modifier above it is not enough) let me know and I'll see if I can finish it off.
This is a map plugin that allows you to have a single map render out to multiple material ID's. There are times when a Multi-Sub *material* is way more than you need, where the only real difference between the different materials will be one or two maps. So just use maps instead.
Hacked together for use with the Vray Displacement modifier, also useful for specular slots, displacement via material, etc. Current limitation is that it is not mental ray compatible. Also that it is hard-wired to 15 slots. If anyone needs more there is at least one other free plugin that does the same thing with unlimited slots. Download here R6/R7- copy it to your plugins directory and restart max.
This is a Render Effect that stamps on some useful data - specifiable text (ie render time, result of a script), image aspect guides, center guide, left/right guides, monitor and title safety (TV). Go HERE for the information and download page.
Material for generating shadow passes - based on the Matte/Shadow but outputs colour information (so supports coloured lights). Go HERE for the information and download page.
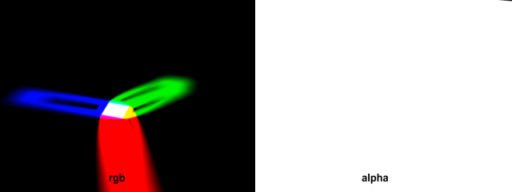
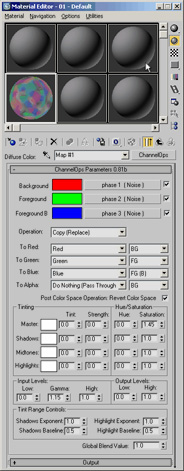
This is a map plugin that allows you to control the individual RGB output of the map, with 3 slots to populate with submaps and various transfer modes. Loosely based on the Digital Fusion Boolean tool, it also has features from the Digital Fusion Color Corrector - with color correction by shadows, midtones and highlights. There is also some control over what is defined as shadow/midtones/highlights to cater for a range of inputs. Some basic emulation of the photoshop levels tool is also included. Current limitation is that it pretty much does nothing in the Bump channel, I'll hopefully get time to work it out some day. In the meantime this can still occasionally be a useful tool. Go to the ChannelOps Info/Download page
Below are some freely downloadable and useable tools for commercial or non-commercial use, some require that RPMdlx.dlx from either the RPManager or RPManagerLite installations is installed, or you can download the R5.1 plugin here, or the R6.0/R7.0 plugin here (put it in your plugins directory, or equivalent, and restart 3dsmax).
This tool unwraps your mesh and exports the edges as paths in an Adobe Photoshop file - the unwrapped mesh is then easily used as a template for painting etc. and allows resizing of the psd file with no loss of precision in the accuracy of the paths. Photoshop's built in hotkeys to show/hide the current path make it easy to work with, and each polygon is exported as a separate path allowing for selections in photoshop based on poly's. Supports specified mapping channel, UV/VW/UW unwrapping, with filters for selected faces, material id's, smoothing groups, as well as offering a Wrap Around mode (as per most other unwrappers). Batch unwrapping multiple objects is supported, but not batch unwrapping multiple UV channels (yet). Interface
snapshot
This is a new version of the skintoolsenv that is has been available for some years now, it can save large amounts of time when setting up skinned characters. New features include a reworked UI allowing finer control over start/middle/end envelope crosssections with modify value by absolute/relative/percent, the ability to rotate indvidual bones (very useful for when they initialise in the wrong orientation), an assign skin feature which allows you to set the initialisation parameters, dockability, compact floaters for all and selected bone controls, choice of axis for the move crosssection end mode, and a replace bone feature which allows you to replace an existing bone in your rig with an object not currently in the rig while maintaining the enveloping and weighting. After running the script in the downloadable zip file you can find it in the 'RPManager' category of your customise UI controls. Note that you need to have a skin modifier active in the modify panel, and if this tool was already open have used the 'rebuild Selection Sets/Bones' button to initialise the script properly. Interface
snapshot 1
This tool is designed to make it easier to get to the files you are currently working on, or just want to have handy - it presents a customisable list of directories that you can open from with a double click - or merge from, save from, or open scripts from (useful for scripters too... funny about that). New for 0.96 is Ideal for times you are working with many shots and find yourself jumping around between them, TD's should get good value from this, as will scripters working on multiple scripts. You can colour code the directories it lists, have them display an alternate name to the base directory, and set up filters for which directories to show for the container directories. Check the help file (not yet available) for a description of how to manage your paths. Usage: There are two
ways of setting up what paths to display - container paths and include
sets. Container paths display all the directories
in the path you specify, which you can filter (ie a filter of 'shots*'
will show only directories starting with 'shots'). Include
sets allow you to specify the exact paths to display in the
list. Both container paths and include sets can be used together and
are picked from the dropdown list at the bottom of the interface. When you first install quickNav a container path and an include set are created automatically to get you started. Install by running the
.mzp that is downloadable - if it ends up as a .zip file rename it to
.mzp. It can be found in the RPManager group of the customise UI, but
also opens immediately after intallation, from there via a RC on the
list you can set it to open automatically when you open max and do
stuff like have it dock by default too. NOTE The secondary paths feature in the RC menu is unavailable at the moment, it will allow you to load a second list of paths so you could have both a local set of paths as well as being able to subscrbe to a second set which could be on a network drive and shared by many. Interface
snapshot: Floating NEW:
updated for .NET controls ie for 64 bit max9/2008. Also works in 32 bit
max9+.
|


